
Appearance
服务器初始化
连接到云服务器
SSH 基本连接
macOS / Linux 内置 OpenSSH,Windows 10 1809+ 也内置,均可直接在终端中使用相同命令:
bash
# 密码登录
ssh root@<服务器IP>

# 指定端口
ssh -p <端口号> root@<服务器IP>

# 使用密钥登录(macOS / Linux)
ssh -i ~/.ssh/id_ed25519 root@<服务器IP>

# 使用密钥登录(Windows)
ssh -i C:\Users\你的用户名\.ssh\id_ed25519 root@<服务器IP>
配置 SSH 别名(推荐)
编辑 SSH 配置文件,避免每次输入 IP 和参数:
- macOS / Linux:
~/.ssh/config - Windows:
C:\Users\你的用户名\.ssh\config
ini
# 一台服务器对应一个 Host 块,Host 后面是自定义别名
Host myserver
  HostName <服务器IP>
  User root
  Port 22
  IdentityFile ~/.ssh/id_ed25519

# 多台服务器直接往下追加,别名不能重复
Host dev
  HostName <开发服务器IP>
  User deploy
  Port 2222
  IdentityFile ~/.ssh/id_ed25519

Host prod
  HostName <生产服务器IP>
  User deploy
  Port 2222
  IdentityFile ~/.ssh/id_ed25519

# 不同服务器用了不同密钥对时,各自指定
Host github.com
  HostName github.com
  User git
  IdentityFile ~/.ssh/id_ed25519_github
之后直接用别名登录,无需记 IP 和参数:
bash
ssh myserver   # 等价于 ssh -p 22 -i ~/.ssh/id_ed25519 root@<服务器IP>
ssh dev        # 等价于 ssh -p 2222 -i ~/.ssh/id_ed25519 deploy@<开发服务器IP>
ssh prod
生成与配置 SSH 密钥对(推荐)
密钥登录比密码登录更安全,强烈推荐:
bash
# 生成密钥对(通用,一路回车即可)
ssh-keygen -t ed25519 -C "your@email.com"
ed25519算法比rsa更安全且密钥更短,新环境优先使用。生成后会得到两个文件:id_ed25519(私钥,只留本地)和id_ed25519.pub(公钥,上传到服务器)
上传公钥到服务器(首次仍需密码):
bash
# macOS / Linux(ssh-copy-id 追加写入,不会覆盖已有公钥)
ssh-copy-id -i ~/.ssh/id_ed25519.pub root@<服务器IP>

# Windows(PowerShell,内置 OpenSSH 无 ssh-copy-id)
type $env:USERPROFILE\.ssh\id_ed25519.pub | ssh root@<服务器IP> "cat >> ~/.ssh/authorized_keys"
多台设备(如 Mac + Windows)依次执行后,服务器的
~/.ssh/authorized_keys中会保存每台设备的公钥,各设备均可正常登录,互不影响
常见报错:REMOTE HOST IDENTIFICATION HAS CHANGED
执行 ssh 或上传公钥时若出现以下错误:
WARNING: REMOTE HOST IDENTIFICATION HAS CHANGED!
Offending ECDSA key in ~/.ssh/known_hosts:11
Host key verification failed.原因:SSH 在本地 ~/.ssh/known_hosts 中保存了每台服务器的指纹(fingerprint)。当服务器重装系统、更换机器后,指纹发生变化,SSH 检测到不匹配就会拒绝连接(防止中间人攻击)。
解决方法是删除本地缓存的旧指纹(通用):
bash
# -R(Remove):从 known_hosts 中删除指定 IP 的旧记录
ssh-keygen -R <服务器IP>
然后重新连接,输入 yes 确认新指纹即可:
The authenticity of host '...' can't be established.
ED25519 key fingerprint is SHA256:xxxxxx.
Are you sure you want to continue connecting (yes/no)? yes
如能通过云厂商控制台(VNC)确认指纹一致更安全;重装系统后直接信任即可
VS Code Remote-SSH(通用)
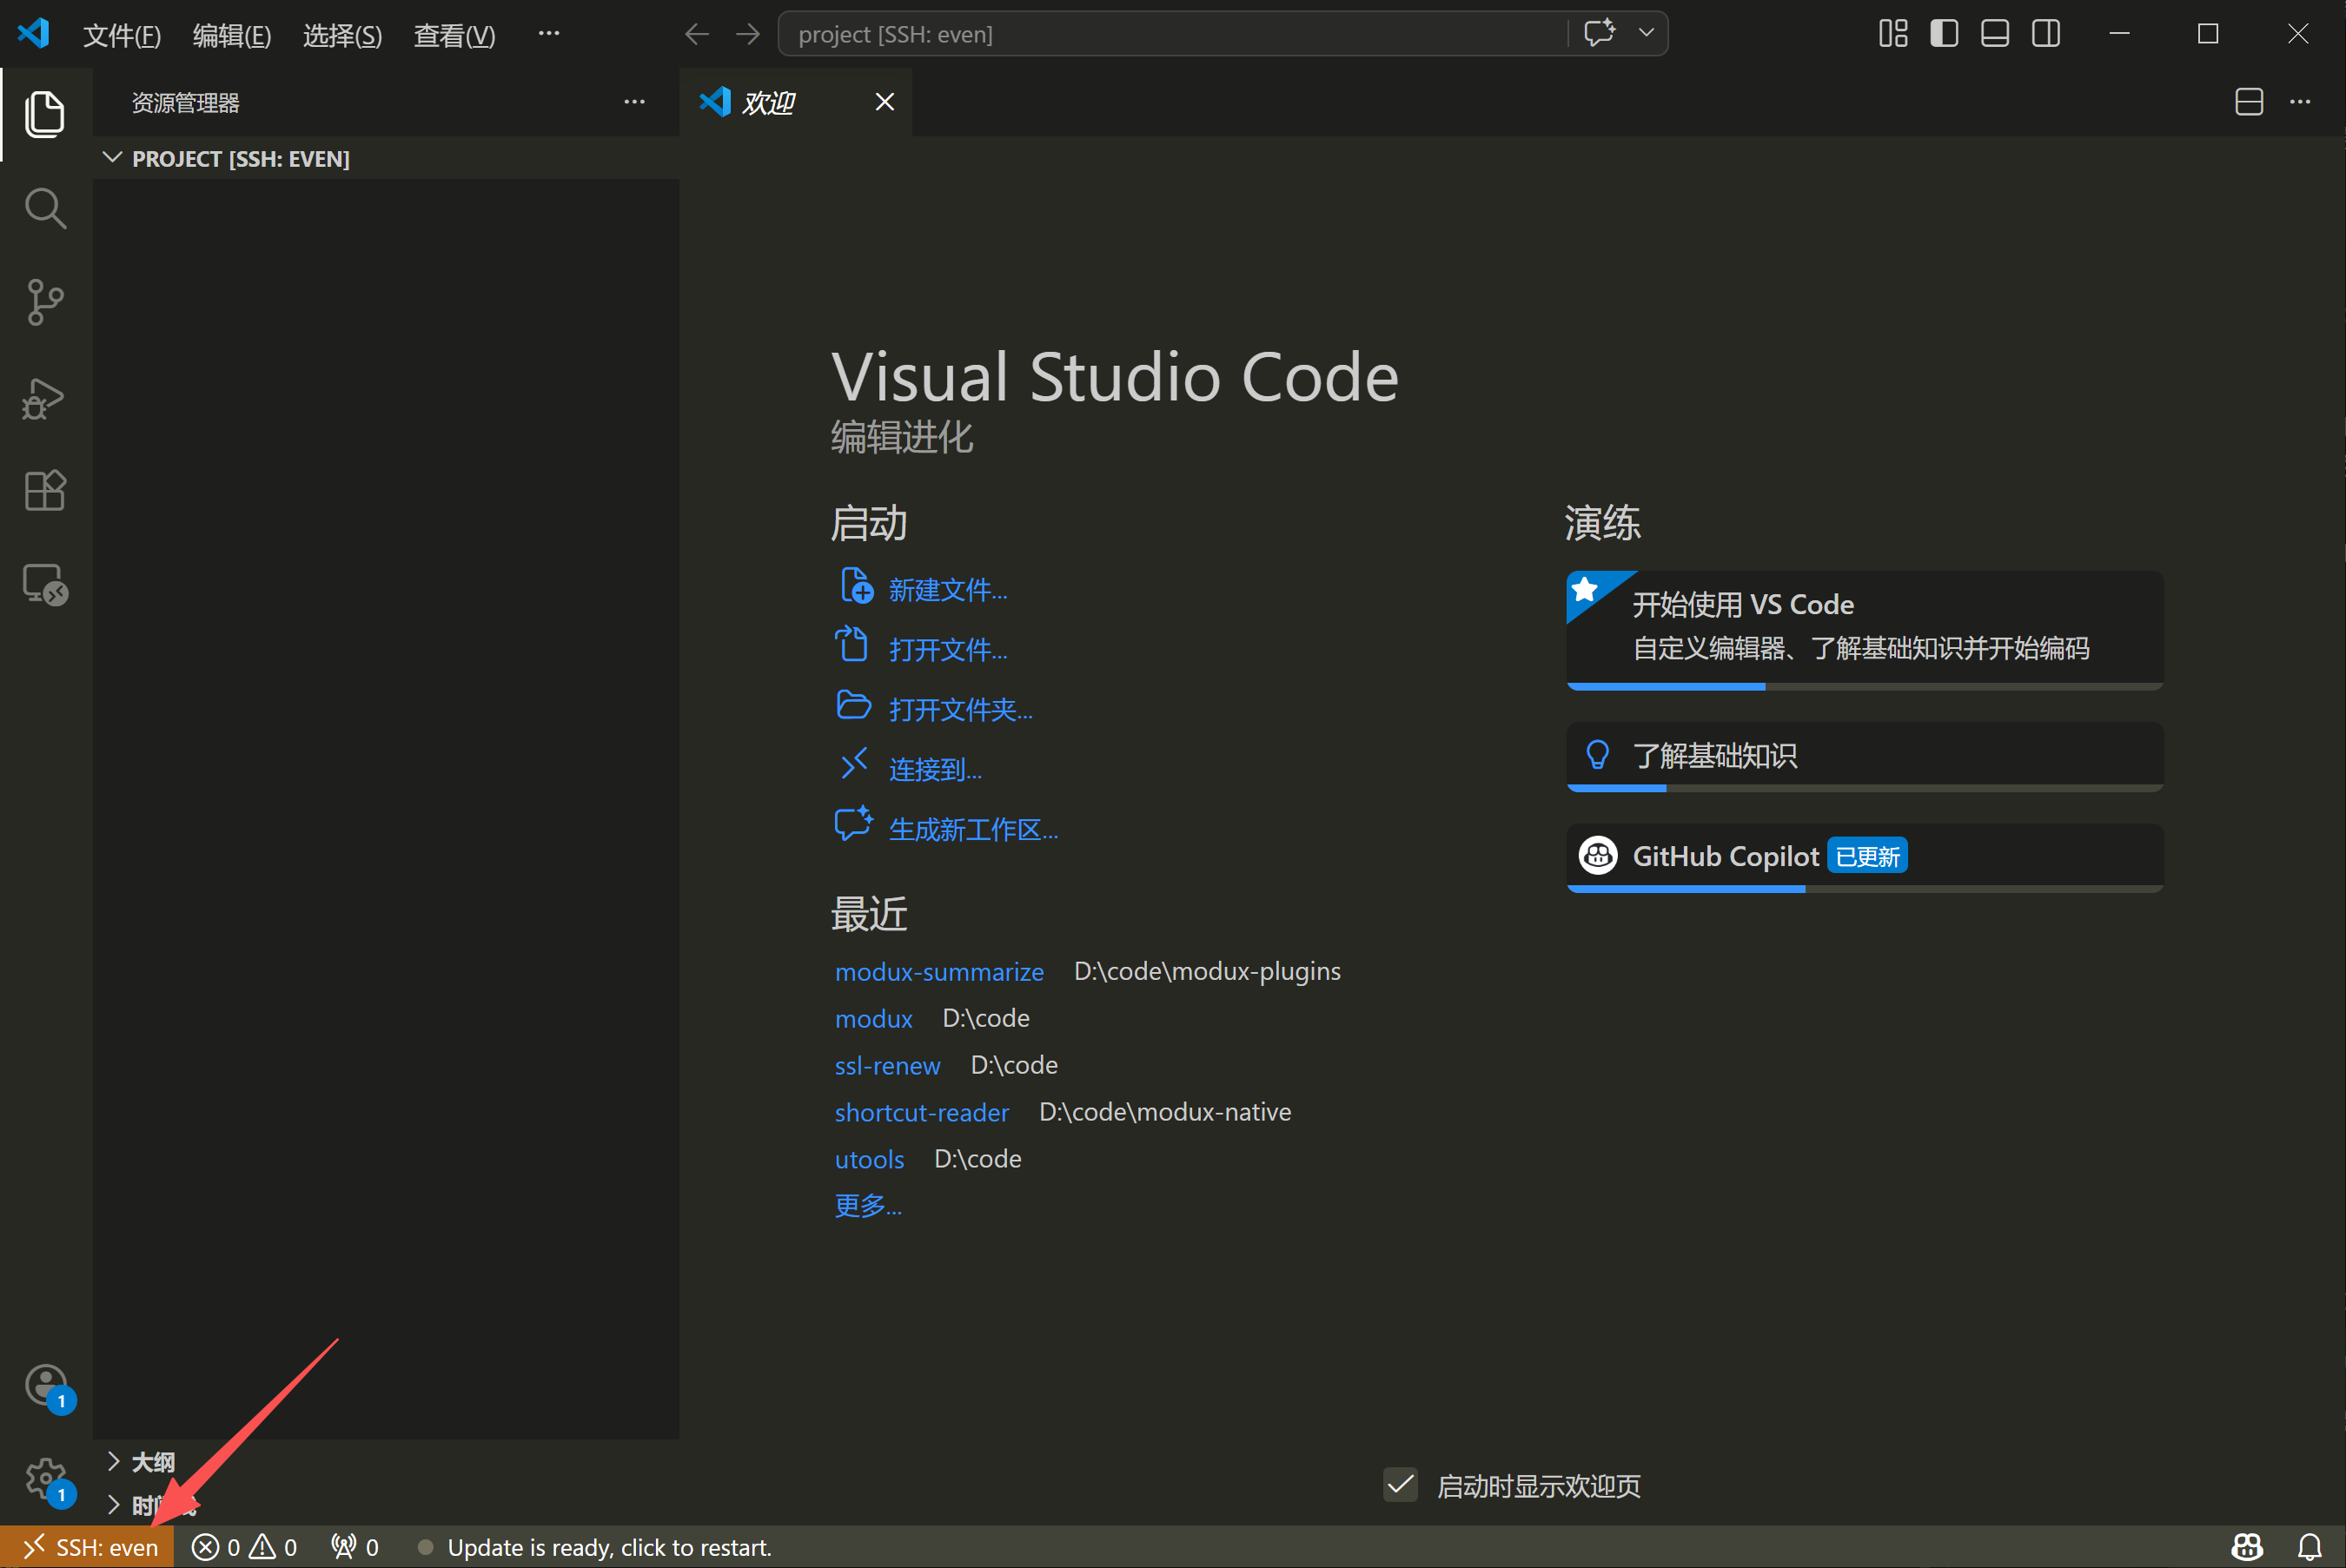
安装 Remote - SSH 插件后,可在 VS Code 中直接连接服务器并编辑远程文件:
Ctrl + Shift + P(macOS 用Cmd + Shift + P)打开命令面板- 输入
Connect to Host,选择Remote-SSH: Connect to Current Host... - 选择已配置的 SSH 别名(如
myserver),插件会自动读取 SSH 配置文件中的主机信息(即上方「配置 SSH 别名」章节中配置的 Host,macOS/Linux 为~/.ssh/config,Windows 为C:\Users\你的用户名\.ssh\config) - 新窗口打开后即连接到服务器,左下角显示当前连接的主机名
Windows 专有工具
Xshell + Xftp(可视化)
免费下载 Xshell / Xftp(家庭/学校免费授权)
- Xshell:SSH 终端,支持多标签、密钥登录、会话管理
- Xftp:SFTP 客户端,可视化拖拽上传/下载文件,与 Xshell 配套使用
系统初始化
更新系统软件包
CentOS / RHEL(yum/dnf):
bash
yum update -y
# CentOS Stream 9+ / RHEL 9+
dnf update -y
Ubuntu / Debian(apt):
bash
apt update && apt upgrade -y安装常用工具
bash
# CentOS / AlmaLinux / RHEL
yum install -y vim wget curl git lsof net-tools unzip tar \
  bind-utils bash-completion tree

# htop 在 EPEL 源中,需单独安装
# CentOS / AlmaLinux(RHEL 8 系)
yum install epel-release -y && yum install htop -y
# Alibaba Cloud Linux 4 / Anolis OS(RHEL 9 系,无 epel-release 包)
dnf install -y https://dl.fedoraproject.org/pub/epel/epel-release-latest-9.noarch.rpm && dnf install htop -y

# Ubuntu / Debian
apt install -y vim wget curl git htop lsof net-tools unzip tar \
dnsutils bash-completion tree| 工具 | 用途 |
|---|---|
vim | 文本编辑器 |
wget / curl | 下载文件、接口调试 |
git | 代码管理 |
htop | 资源监控(CPU / 内存 / 进程) |
lsof | 查看端口占用 |
net-tools | 提供 netstat 命令 |
tree | 目录树形展示 |
设置时区
bash
# 查看当前时区
timedatectl

# 设置为上海时区(东八区)
timedatectl set-timezone Asia/Shanghai

# 验证
date
创建普通用户(禁止直接用 root 操作)
长期使用 root 操作服务器风险极高,应创建一个普通用户并赋予 sudo 权限:
bash
# 创建用户
useradd -m -s /bin/bash deploy

# 设置密码
passwd deploy

# 赋予 sudo 权限
usermod -aG wheel deploy   # CentOS
usermod -aG sudo deploy    # Ubuntu

# 将本地公钥配置给新用户(免密登录)
# 如果 root 之前是密钥登录,直接复制 authorized_keys
mkdir -p /home/deploy/.ssh
cp /root/.ssh/authorized_keys /home/deploy/.ssh/
chown -R deploy:deploy /home/deploy/.ssh
chmod 700 /home/deploy/.ssh
chmod 600 /home/deploy/.ssh/authorized_keys

# 如果 root 之前是密码登录,手动写入本地公钥内容(在本地执行下方命令获取)
# cat ~/.ssh/id_ed25519.pub
# 将输出的内容粘贴到服务器的 /home/deploy/.ssh/authorized_keys 中
安全加固
SSH 配置加固(核心)
这是最重要的一步,能有效防止自动化暴力破解:
bash
# 备份原始配置
cp /etc/ssh/sshd_config /etc/ssh/sshd_config.bak

# 编辑配置
vim /etc/ssh/sshd_config
关键配置项:
ini
# 修改默认端口(避开 22,使用 1024~65535 中的非常用端口)
Port 2222

# 禁止 root 直接登录(创建普通用户后操作)
PermitRootLogin no

# 禁止密码登录,只允许密钥登录(配置好公钥再开启)
PasswordAuthentication no
PubkeyAuthentication yes

# 禁用空密码
PermitEmptyPasswords no

# 限制最大认证尝试次数
MaxAuthTries 3

# 减少未认证连接超时时间(默认 120s)
LoginGraceTime 30

# 禁用 X11 转发(不需要 GUI)
X11Forwarding no

# 限制允许登录的用户(白名单)
AllowUsers deploy
bash
# 检查配置语法
sshd -t

# 重启 SSH 服务(不要关闭当前会话!另开一个窗口验证新配置能登录后再关闭旧会话)
systemctl restart sshd重要:修改端口后,先新开终端验证新端口可登录,再关闭旧会话,防止被锁在门外
防火墙配置
云服务器通常有两层防火墙,搞清楚各自职责再操作:
| 层级 | 位置 | 配置方式 | 说明 |
|---|---|---|---|
| 安全组 | 云厂商网络层 | 控制台 → 安全组 / 入站规则 | 流量在网络层拦截,未通过的压根进不了服务器 |
| 系统防火墙 | 服务器操作系统 | firewalld / ufw | 第二道防线,防止内网横向渗透 |
推荐做法:安全组 + 系统防火墙双层防护
第一步:云控制台安全组配置(必做)
在阿里云 / 腾讯云 / AWS 控制台的"安全组"中,按需开放入站端口:
| 端口 | 协议 | 用途 |
|---|---|---|
| 2222 | TCP | SSH(改过的端口) |
| 80 | TCP | HTTP |
| 443 | TCP | HTTPS |
80 / 443 等业务端口在安全组配置即可,不一定需要在系统防火墙再配一遍
第二步:系统防火墙(可选,推荐开启)
系统防火墙主要用于限制 SSH 来源 IP(如只允许公司固定 IP),或防止容器/进程意外暴露端口:
CentOS(firewalld):
bash
# 启动并设置开机自启
systemctl start firewalld
systemctl enable firewalld

# 仅开放 SSH 新端口(业务端口交给安全组管)
firewall-cmd --permanent --add-port=2222/tcp

# 移除默认 22 端口规则(确认新端口可登录后再执行)
firewall-cmd --permanent --remove-service=ssh

# 重载规则生效
firewall-cmd --reload

# 验证
firewall-cmd --list-ports
Ubuntu(ufw):
bash
# 设置默认策略:拒绝所有入站,允许所有出站(必须在 enable 之前设置)
ufw default deny incoming
ufw default allow outgoing

# 仅开放 SSH 新端口
ufw allow 2222/tcp

# 启用防火墙
ufw enable

# 查看规则
ufw status verbose
若服务器在 Docker 环境下,注意 Docker 会绕过 ufw 直接操作 iptables,需额外配置才能让 ufw 管控容器端口
安装 Fail2ban(防暴力破解)
Fail2ban 通过监控日志,自动封禁连续登录失败的 IP:
bash
# CentOS(需先启用 EPEL 源)
yum install epel-release -y && yum install fail2ban -y

# Ubuntu
apt install fail2ban -y
创建本地配置文件(不要修改 .conf,只修改 .local):
bash
cp /etc/fail2ban/jail.conf /etc/fail2ban/jail.local
vim /etc/fail2ban/jail.local
关键配置:
ini
[DEFAULT]
# 封禁时长(秒),-1 为永久封禁
bantime  = 3600
# 检测时间窗口
findtime = 600
# 最大失败次数
maxretry = 5
# 白名单(本机 IP 不要封)
ignoreip = 127.0.0.1/8 ::1

[sshd]
enabled  = true
port     = 2222        # 改为你的 SSH 端口
logpath  = %(sshd_log)s
backend  = %(sshd_backend)s
bash
# 启动并设置开机自启
systemctl start fail2ban
systemctl enable fail2ban

# 查看封禁状态
fail2ban-client status sshd

# 手动解封某个 IP
fail2ban-client set sshd unbanip <IP>
禁用不必要的服务
bash
# 查看开机自启的服务
systemctl list-unit-files --state=enabled

# 常见可禁用的服务(先用 systemctl status <服务名> 确认存在再操作)
systemctl disable --now postfix     # 邮件服务(云服务器通常存在,不用则禁用)
systemctl disable --now bluetooth   # 蓝牙(桌面系统才有,云服务器一般不存在)
systemctl disable --now cups        # 打印服务(桌面系统才有,云服务器一般不存在)
对不存在的服务执行 disable 会提示 "Unit not found",无副作用,忽略即可
配置系统内核参数(可选)
bash
vim /etc/sysctl.confini
# 防止 IP 欺骗
net.ipv4.conf.all.rp_filter = 1
net.ipv4.conf.default.rp_filter = 1

# 防止 SYN 洪水攻击
net.ipv4.tcp_syncookies = 1

# 禁止 ICMP 重定向(防中间人)
net.ipv4.conf.all.accept_redirects = 0
net.ipv4.conf.all.send_redirects = 0

# 忽略 ping 请求(可选,防扫描)
net.ipv4.icmp_echo_ignore_all = 1
bash
# 立即生效
sysctl -p
配置 Swap(低内存服务器)
1 核 1G 或 2G 内存的服务器,建议配置 Swap 防止 OOM(内存耗尽):
bash
# 创建 2G Swap 文件
fallocate -l 2G /swapfile
chmod 600 /swapfile
mkswap /swapfile
swapon /swapfile

# 设置开机自动挂载
echo '/swapfile none swap sw 0 0' >> /etc/fstab

# 调整 Swappiness(值越低越倾向用物理内存,服务器推荐 10)
echo 'vm.swappiness=10' >> /etc/sysctl.conf
sysctl -p

# 验证
free -h
快速检查清单
| 项目 | 命令 |
|---|---|
| 查看系统版本 | cat /etc/os-release |
| 查看内存使用 | free -h |
| 查看磁盘空间 | df -h |
| 查看 CPU 核数 | nproc |
| 查看所有监听端口 | ss -tlnp |
| 查看登录日志(暴力破解) | lastb | head -20 |
| 查看当前登录用户 | who |
| 查看防火墙状态 | firewall-cmd --list-all |
| 查看 Fail2ban 封禁 | fail2ban-client status sshd |
自动安全更新
手动更新难以坚持,配置自动安全更新可在无人值守时修补已知漏洞。
Ubuntu(unattended-upgrades):
bash
apt install unattended-upgrades -y

# 交互式开启(选 Yes)
dpkg-reconfigure --priority=low unattended-upgrades
编辑 /etc/apt/apt.conf.d/50unattended-upgrades,确认以下内容未被注释:
ini
Unattended-Upgrade::Allowed-Origins {
    "${distro_id}:${distro_codename}-security";
};

# 自动删除不再需要的依赖
Unattended-Upgrade::Remove-Unused-Dependencies "true";

# 必要时自动重启(凌晨低峰期)
Unattended-Upgrade::Automatic-Reboot "true";
Unattended-Upgrade::Automatic-Reboot-Time "02:00";
bash
# 验证配置是否生效
unattended-upgrade --dry-run --debug
CentOS / RHEL(dnf-automatic):
bash
dnf install dnf-automatic -y编辑 /etc/dnf/automatic.conf:
ini
[commands]
# 仅应用安全更新
upgrade_type = security
apply_updates = yes

[emitters]
# 可配置邮件通知(需要 MTA)
emit_via = stdio
bash
# 启动定时任务(每天自动检查并应用)
systemctl enable --now dnf-automatic.timer

# 查看定时任务状态
systemctl status dnf-automatic.timer
系统日志持久化
默认情况下,部分系统的 journald 日志存在内存中,重启后丢失,需手动配置持久化:
bash
# 查看当前日志存储方式(Persistent 表示已持久化)
journalctl --disk-usage

# 创建持久化目录(journald 检测到此目录即自动切换为持久模式)
mkdir -p /var/log/journal
systemd-tmpfiles --create --prefix /var/log/journal
编辑 /etc/systemd/journald.conf:
ini
[Journal]
# 持久化到磁盘(auto 表示目录存在则持久化)
Storage=persistent

# 压缩日志,节省磁盘
Compress=yes

# 日志最大占用磁盘空间
SystemMaxUse=500M

# 至少保留的磁盘空闲空间
SystemKeepFree=100M

# 日志保留时长
MaxRetentionSec=1month
bash
# 重启 journald 生效
systemctl restart systemd-journald

# 验证
journalctl --disk-usage
journalctl -n 20    # 查看最近 20 条日志,确认可读
SELinux / AppArmor
两者都是强制访问控制(MAC)系统,限制进程只能访问它被允许的资源。CentOS 默认使用 SELinux,Ubuntu 默认使用 AppArmor。
SELinux(CentOS)
bash
# 查看当前模式(Enforcing / Permissive / Disabled)
getenforce
sestatus| 模式 | 说明 |
|---|---|
| Enforcing | 强制模式,违规操作直接拒绝(推荐) |
| Permissive | 宽容模式,只记录违规不阻止(排查用) |
| Disabled | 完全禁用(不推荐) |
bash
# 临时切换为宽容模式(重启后失效,用于排查服务启动失败问题)
setenforce 0

# 恢复强制模式
setenforce 1

# 查看最近的 SELinux 拒绝日志
ausearch -m avc -ts recent | tail -20

# 永久配置(需重启生效)
vim /etc/selinux/config
ini
# /etc/selinux/config
SELINUX=enforcing    # 推荐
# SELINUX=permissive
# SELINUX=disabled   # 修改后重启,切勿直接在 Enforcing 下切换到 Disabled
若服务因 SELinux 报错启动失败,先用
setenforce 0临时关闭确认,再用audit2allow生成规则而不是直接禁用
AppArmor(Ubuntu)
bash
# 查看状态(列出各进程的 profile 及模式)
aa-status

# 查看已有配置文件
ls /etc/apparmor.d/

# 将某个 profile 切换为强制模式
aa-enforce /etc/apparmor.d/<profile名>

# 切换为宽容模式(排查问题)
aa-complain /etc/apparmor.d/<profile名>

# 重载所有 profile
systemctl reload apparmor
ClamAV 病毒扫描
云服务器遭到 WebShell 入侵时,ClamAV 可协助发现恶意文件:
bash
# CentOS(需 EPEL 源)
yum install epel-release -y && yum install clamav clamav-update -y

# Ubuntu
apt install clamav clamav-daemon -y
bash
# 停止服务后更新病毒库(freshclam 需要独占运行)
systemctl stop clamav-freshclam
freshclam
systemctl start clamav-freshclam

# 手动扫描指定目录(--infected 只输出感染文件,--remove 自动删除)
clamscan -r /var/www --infected --remove

# 扫描整个系统(耗时较长,建议在低峰期执行)
clamscan -r / --exclude-dir="^/sys|^/proc|^/dev" --infected --log=/var/log/clamav-scan.log
配置定时扫描(每天凌晨 3 点):
bash
crontab -ebash
0 3 * * * clamscan -r /var/www --infected --remove --log=/var/log/clamav-scan.logbash
# 查看扫描日志
tail -50 /var/log/clamav-scan.log
ClamAV 主要用于检测已知特征的恶意文件,不能替代防火墙和访问控制,属于事后检测手段